

The Elf’s Hat Crochet Pattern is modified Santa’s Hat. So it also uses the waffle stitch to create this pretty woven look. I love the fun pom pom and colorfull strips.
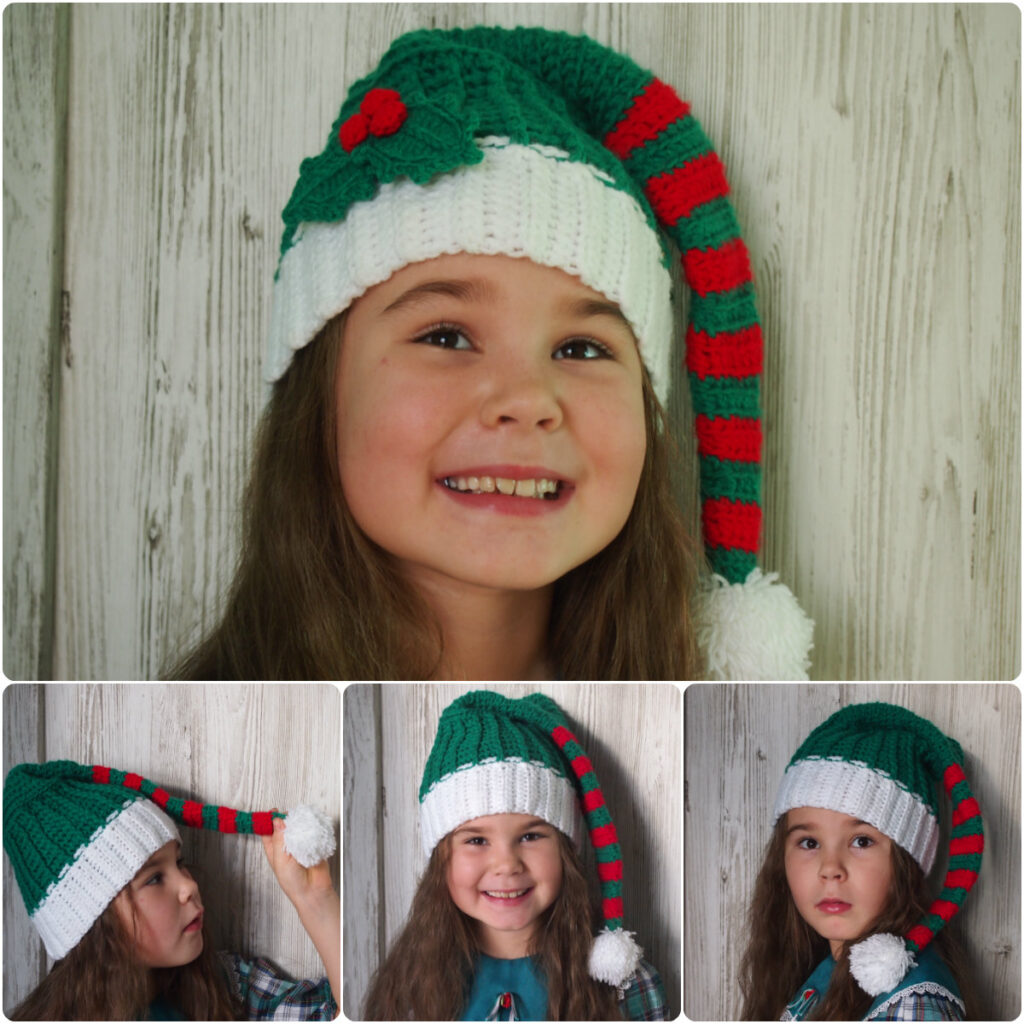
Bit if you think that you need to add something to this hat so make the holly leaves with berriesand sew on the hat:

Christmas Mouse patterns in my blog:

🎅Christmas Elf 🎅 ❄Lollipop coasters❄ 🎅Santa Owl🎅
– Written in US terms– hat is worked from the bottom up starting with the ribbed brim

Materials:
Yarn: Use Medium weight yarn, such as ZZ Twist Yarn – 1 skein of white and 1 skein of green
Notions: Scissors, yarn needle.
Crochet hook: 7 (4,5 mm)
Crochet abbreviations:
Ch – chain
Sc – single crochet
Ss – slip stitch
St(s) – stitch(s)
Dc – double crochet
Fpdc – front post double crochet
Bpdc – back post double crochet
Fpdc2tog – front post double crochet 2 together (front post double crochet decrease)
Bpdc2tog – back post double crochet 2 together (back post double crochet decrease)
Instructions.
Ribbed brim
Row 1: Chain 12 with white color yarn, hdc in the 3rd ch from the stitch, hdc in the next 9 sts, ch 2, turn.
Row 2: hdc in the back loop of each next 10 sts, ch 2, turn.
Row 3-44: repeat Row 2, do not break yarn. (44) (to adjust circumference, add or take out ribbing. The number of rows must be a multiple of 4)
Bring both ends of the ribbing together to create a circle. Sc both short ends together. Now you will work around the long edge of the ribbing to start the body of the hat.
Hat Body
Row 1: you will now be working along the edges of the 44 rows you just completed. Ch1, 2 sc in each hdc, join to first ch with sl st. Break yarn and fasten off. (88)
Row 2: join new yarn (green), ch 3 (beginning ch count as stitch), bpdc in next 2 sts, fpdc in the next st, * bpdc in 3 stitches, fpdc in the next st * repeat from * to * around, join to 3rd ch with sl st (88)

Row 3: repeat Row 2.
Row 4: ch 3, bpdc in next 2 sts, fpdc in the next st, * bpdc in the next st, bpdc2tog , fpdc in the next st , bpdc in 3 stitches, fpdc in the next st * repeat from * to * around, join to 3rd ch with sl st. (77)
Row 5: ch 3, bpdc in next 2 sts, fpdc in the next st, * bpdc in 2 stitches, fpdc in the next st , bpdc in 3 stitches, fpdc in the next st * repeat from * to * around, join to 3rd ch with sl st (77)
Row 6: repeat Row 5.
Row 7: ch 3, bpdc2tog, fpdc in the next st, * bpdc in the next 2 sts, fpdc in the next st , bpdc in the next stitch, bpdc2tog, fpdc in the next st * repeat from * to * 10 times, bpdc in the next 2 sts, fpdc in the next st, join to 3rd ch with sl st. (66)
Row 8: ch 3, bpdc in next st, fpdc in the next st *bpdc in next 2 sts, fpdc in the next st* repeat from * to * around, join to 3rd ch with sl st (66)
Row 9-10: repeat Row 8.

Row 11: ch 2( further beginning ch does not count as stitch) , 2 hdc in the next st, hdc in each st around, join to 2nd ch with sl st . (66)
Row 12: hdc in each st around, join to 2nd ch with sl st .(66)
Row 13: ch 2, *hdc in the next 4 sts, 2 hdc together* repeat from * to * around, join to 2nd ch with sl st .(55)
Row 14: hdc in each st around, join to 2nd ch with sl st. (55)
Row 15: ch 2, *hdc in the next 3 sts, 2 hdc together* repeat from * to * around, join to 2nd ch with sl st .(44)
Row 16-17: hdc in each st around, join to 2nd ch with sl st . (44)
Row 18: ch 2, *hdc in the next 2 sts, 2 hdc together* repeat from * to * around, join to 2nd ch with sl st .(33)

Row 19-24: hdc in each st around, join to 2nd ch with sl st . (33)
Row 25: ch 2, *hdc in the next st, 2 hdc together* repeat from * to * around, join to 2nd ch with sl st .(22)
Row 26-27: ch 2, hdc in each st around, join to 2nd ch with sl st . (22) Change the color.
Row 27-28: with red color yarn ch 2, hdc in each st around, join to 2nd ch with sl st . (22) Change the color.
Row 29-30: with green color yarn ch 2, hdc in each st around, join to 2nd ch with sl st . (22) Change the color.

Row 31: with red color yarn ch 2, hdc in next 20 sts, 2 hdc together, join to 2nd ch with sl st . (21)
Row 32: ch 2, hdc in each st around, join to 2nd ch with sl st . (21) Change the color.
Row 33: with green color yarn ch 2, hdc in next 19 sts, 2 hdc together, join to 2nd ch with sl st . (20)
Row 34: ch 2, hdc in each st around, join to 2nd ch with sl st . (20) Change the color.
Row 35: with red color yarn ch 2, hdc in next 18 sts, 2 hdc together, join to 2nd ch with sl st . (19)
Row 36: ch 2, hdc in each st around, join to 2nd ch with sl st . (19) Change the color.
Row 37: with green color yarn ch 2, hdc in next 17 sts, 2 hdc together, join to 2nd ch with sl st . (18)
Row 38: ch 2, hdc in each st around, join to 2nd ch with sl st . (18) Change the color.
Row 39: with red color yarn ch 2, hdc in next 16 sts, 2 hdc together, join to 2nd ch with sl st . (17)
Row 40: ch 2, hdc in each st around, join to 2nd ch with sl st . (17) Change the color.
Row 41: with green color yarn ch 2, hdc in next 15 sts, 2 hdc together, join to 2nd ch with sl st . (16)
Row 42: ch 2, hdc in each st around, join to 2nd ch with sl st . (16) Change the color.
Row 43: with red color yarn ch 2, hdc in next 14 sts, 2 hdc together, join to 2nd ch with sl st . (15)
Row 44: ch 2, hdc in each st around, join to 2nd ch with sl st . (15) Change the color.
Row 45: with green color yarn ch 2, hdc in next 13 sts, 2 hdc together, join to 2nd ch with sl st . (14)
Row 46: ch 2, hdc in each st around, join to 2nd ch with sl st . (14) Change the color.
Row 47: with red color yarn ch 2, hdc in next 12 sts, 2 hdc together, join to 2nd ch with sl st . (13)
Row 48: ch 2, hdc in each st around, join to 2nd ch with sl st . (13) Change the color.
Row 49: with green color yarn ch 2, hdc in next 11 sts, 2 hdc together, join to 2nd ch with sl st . (12)
Row 50: ch 2, hdc in each st around, join to 2nd ch with sl st . (12)
Row 51: ch 2, *2 hdc together* repeat around, join to 2nd ch with sl st . (6)
Break yarn, leave a long end for sewing.
With yarn needle, weave the long end in and out of the top loops of the last round. Pull end tight to cinch the top closed. Sew the top closed. Weave in the ends.
Add a pom pom! Your Elf hat is ready!

You can decorate your hat with the holly leaves.

Hope this is what you ended up with! If you need help with the pattern or you have other questions please leave a comment here on my blog!

or the Discount Package HERE

Looking for more patterns? Follow me on Facebook, Instagram, and Pinterest! Please share a pic of your finished product with me. I’d love to see it!
