

Owl Santa, what could be cute? This is one of my favorite winter home decorations. And although I am still in heart and soul in the fall, I think that many have plunged into Christmas thoughts with their heads. Therefore, now is the time to share with you the Owl Santa FREE pattern so that you can crochet him!

- Add to your Ravelry Queue HERE
- Get the ad-free, large print, printable PDF pattern HERE
- Find owls’ patterns HERE

PATTERN.
Materials:
- Any cotton 100% Weight/Yardage 50g/137yds: Cascade Ultra Pima Fine, 100% cotton or Schachenmayr Catania, etc.
- Size D/3 (3 mm) crochet hook
- Tapestry needle
- Scissors
Free Owls patterns in my blog:

🦉Owl Unicorn🦉 🦉 Autumn Owl🦉 🦉 Native American Owl🦉
Abbreviations (US terms):
ch – chain
st st – slip stitch
sc – single crochet
dc – double crochet
sk – skip
st(s) – stitch(es)
Skill Level: Easy
Free Christmas ornaments patterns in my blog:

Santa Mouse Christmas Mitten Christmas Elf Mouse

Instructions.
Body.
Row 1: Chain 16 with white color.
Row 2: sc in the 2nd st from the hook, sc in the next 14 sts, ch, turn.
Row 3: 2 sc in the 1stst, sc in the next 13 sts, 2 sc in the last st, ch, turn.
Row 4: 2 sc in the 1st st, sc in the next 15 sts, 2 sc in the last st, ch, turn.
Row 5: 2 sc in the 1st st, sc in the next 17 sts, 2 sc in the last st, ch, turn.
Row 6: 2 sc in the 1st st, sc in the next 19, 2 sc in the last st, ch, turn.
Row 7: sc in the next 23 sts, ch, turn.
Row 8-10: repeat row 7. Change the color.
Row 10-14: repeat row 7 with red color yarn.
Row 15: sc in the 2nd st, sc in the next 19 sts, 2 sc together in the last st, ch, turn.
Row 16: sc in the next 21 sts, ch, turn.
Row 17: 2 sc in the 1st st, sc in the next 19 sts, 2 sc in the last st, ch, turn.
Row 18: 2 sc in the 1st st, sc in the next 21 sts, 2 sc in the last st, ch, turn.
Row 19: sc in the next 25 sts, ch, turn.
Row 20-24: repeat row 19.
Row 25: sc in the 2nd st, sc in the next 21 sts, 2 sc together in the last st, ch, turn.
Row 26: sc in the next 23 sts, ch, turn.
Row 27-29: repeat row 26.
Row 30: 2 sc in the 1st st, sc in the next 21 sts, 2 sc in the last st, ch, turn.
Row 31-32: sc in the next 25 sts, ch, turn.
Row 33: 2 sc in the 1st st, sc in the next 23 sts, 2 sc in the last st, ch, turn.
Row 34: sc in the next 6 sts, 1 ss, turn.
Row 35: ss in 2nd st, ss, sc in the next 4 sts, 2 ch, turn.
Row 36: sc in the next 2 sts, ss, break yarn.
Repeat from row 34 till row 36, to make the other ear.
Break yarn and fasten off. Make another side just like the one you just made but use only red color yarn.

Wings.
Round 1: Magic ring with red color, 6 sc in the ring, ss, ch.
Round 2: 2 sc in the next 6 sts, ss. Turn.
Row 3: sc in the next 6 sts, ch, turn.
Row 4: sc in the next 5 sts, 2 sc in the next st. Turn.
Row 5: dc in 2nd st, sc in the next st, dc in the next st, tr in the next st, 2 dc in the next st, dc in the last st, ch, turn.
Row 6: sc in the next st, dc in the next st, ss, break yarn, fasten off.
Make another wing just like the one you just made.
Time to decorate our wings. I used slip stiches as you can see at the picture below. And I ended up with that:

Eyes.
Round 1: Magic ring with white color. 6 sc, ss, ch.
Round 2: 2 sc in each next st, ss, ch. (12 sts)
Round 3: 2 sc in each next st, ss, ch. (24 sts)
Round 4: *2 sc in next st, 1 sc in next st* repeat 12 times, ss, ch. (36 sts), break yarn, fasten off.
Sew the eyelashes of the black color.
Nose.
Round 1: Magic ring with yellow color, 6 sc, ss, ch.
Round 2: 1 sc in the next st, 2 sc in the next st, 1 sc in the next st, *1 sc, 1 dc, 1 sc* in the same st, 1 sc in the next st, 2 sc in the next st, ss, break yarn, fasten off.
Belt.
Row 1: Chain 24 with the black color. Turn your work.
Row 2: sc in the next 23 sts, ch, turn.
Row 3-4: repeat row 2. Break yarn and fasten off.
Let’s make the belt clasp with the yellow color yarn.
Chain 20 and ss to the first st to make ring. Then make 2 chain and *dc in the next 4 sts,
3 dc in the same stitch* repeat from* to* 4 times, ss in the first 2 chain,
Hat.
Row 1: Chain 18 with the white color, turn.
Row 2: dc in the next 16 sts, ch 2 with red color, turn. Break white yarn and fasten off.
Row 3: dc in the next 16 sts with the red color, ch 2, turn.
Row 4: dc in the next 14 sts, 2 dc together, ch 2, turn.
Row 5: dc in the next 13 sts, 2 dc together, ch 2, turn.
Row 6: dc in the next 11 sts, 3 dc together, ch 2, turn.
Row 7: dc in the next 9 sts, 3 dc together, ch 2, turn.
Row 8: dc in the next 7 sts, 3 dc together, ch 2, turn.
Row 9: dc in the next 5 sts, 3 dc together, ch 2, turn.
Break yarn and fasten off.
Sew the hat. Then, using a needle let’s attach the upper part of the hat to the lower part. Your hat is ready.

Assembling
Let’s put all the parts together and sew them to the front of our owl. Sew eyes, then beak, belt, belt clasp. And finally sew the wings.
Now join your two “owl” parts wrong sides together. Try to line up them up so they match. You are going to sc around the outside of them to attach them and you want to them to be perfectly lined up. Now stick your hook through both sides and pull the yarn through (like pictured below) and sc with the green color.
Sc in each stitch space of both sides around with green color. Make 2 sc on the corners of owl’s ears and on the bottom corners.
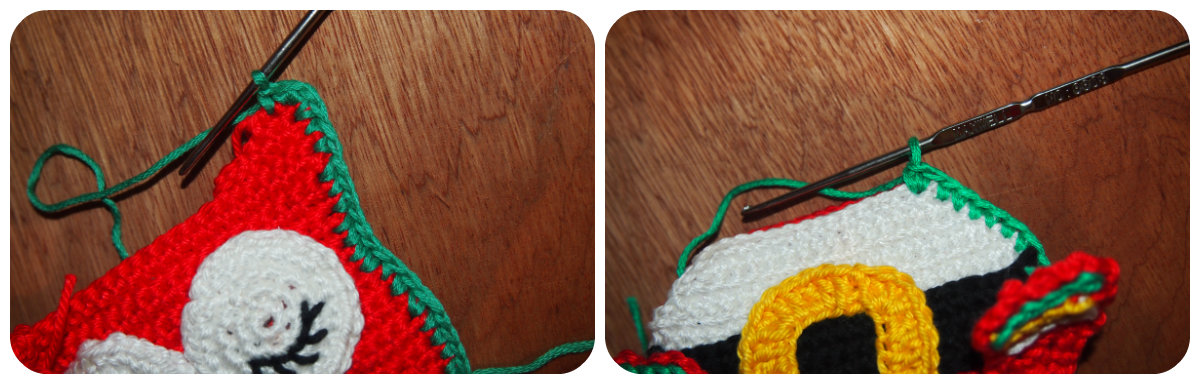
But leave a hole to stuff the owl with toy filling firmly. And then finish to join parts. Break yarn and fasten off.

Sew the hat. And then sew the small pompon. Your owl is ready!
Tree.
Row 1: Chain 10 with gree color yarn. Turn your work.
Row 2: 1 sc in the 2nd chain, sc in next 8 sts. Turn.
Row 3: 1 sc in the 2nd chain, sc in next 7 sts. Turn.
Row 4: 1 sc in the 2nd chain, sc in next 6 sts. Turn.
Row 5: 1 sc in the 2nd chain, sc in next 5 sts. Turn.
Row 6: 1 sc in the 2nd chain, sc in next 4 sts. Turn.
Row 7: 1 sc in the 2nd chain, sc in next 3 sts. Turn.
Row 8: 1 sc in the 2nd chain, sc in next 2 sts. Turn.
Row 9: 1 sc in the 2nd chain, sc in the next st. Turn.
Row 10: 1 sc in the 2nd chain. Break yarn and fasten off.
Turn the tree bottom up and make the foot.
Row 1: Skip 3 sts, sc in the 4th chain stitch, sc in the next 2 sts, 1 ch. Turn your work.
Row 2: sc in the next 2 sts. Break yarn and fasten off.
Time to decorate our Christmas tree. I used slip stiches as you can see at the pictures below.
That’s it. Our Christmas tree is ready. You can make a star on the top, if you like.

Your owl Santa is ready!

![]()

Hope this is what you ended up with! If you need help with the pattern or you have other questions please leave a comment here on my blog!
- Get the Pattern Bundle that includes 130 Christmas, autumn, princesses, Valentine, superheroes ,Winnie the Pooh, Wizard of Oz, Star Heroes and many others Mouse ornaments HERE

Looking for more patterns? Follow me on Facebook, Instagram, and Pinterest! Please share a pic of your finished product with me. I’d love to see it!
